Tools
- A 3DS with PCalc (PCalc Installation Guide)
- 3DSRNGTool
Recommended Reading
- SOS Call Rates
- Use Ctrl + F to quickly find Pokémon for SOS.
- Encounter Slots for Sun
- Encounter slots for Moon are missing, but the differences are minimal. We'll update this guide later.
Note: The steps below are based on USUM, but SOS RNG for SM is exactly the same. Just follow this guide with your profile settings without worrying about minor differences.
Understanding SOS RNG
SOS RNG involves two key processes:- G7 SFMT (32bit): The SOS RNG. This controls encounter slots, call success, and level.
- This RNG allows you to target specific Pokémon, like that 1% Salamence.
- Main RNG: Determines IVs, nature, gender, and PID (including shininess).
- Two Pokémon on the field, and one faints.
- The last call failed, and you need an item to trigger another call (more stable and ideal for RNG).
Note: Set up the SOS chain before starting RNG. Use low-health Pokémon and an Adrenaline Orb to maximize call success.
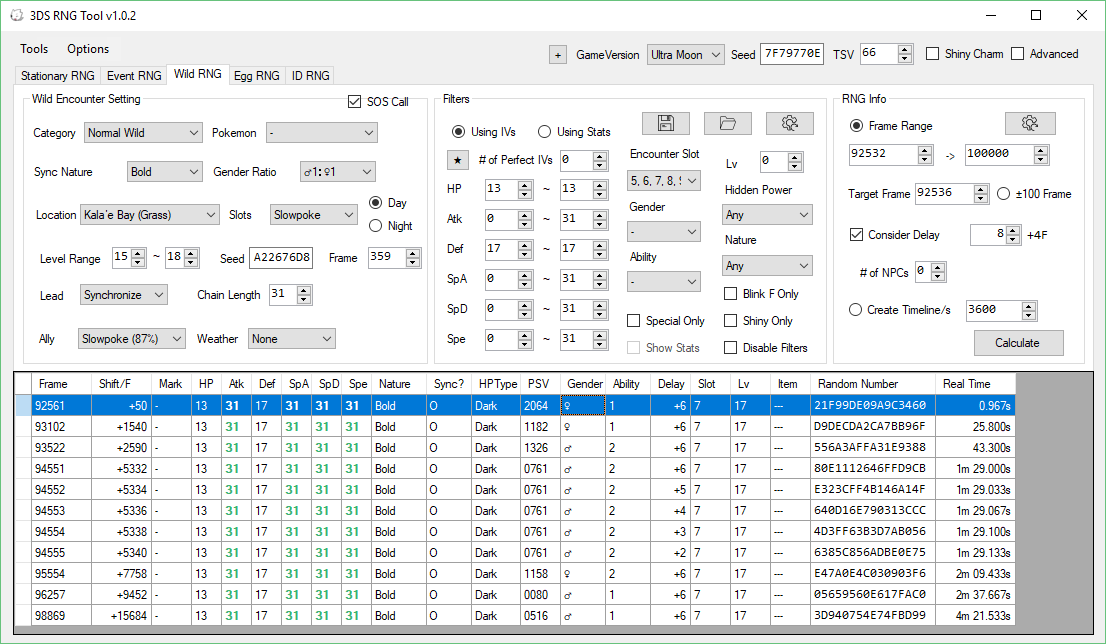
Step 1: Set Up 3DSRNGTool
- Enter your game version and TSV (Start + Up in PCalc will reveal TSV in the Game View window).
- Also, input the initial seed. Find it in the Game View window where it says "Init Seed".
- If you have the Shiny Charm, check the Shiny Charm box.
Step 2: Find the SOS Pokémon and Set Up the Misc. RNG Tool
-
Wander around or RNG the correct Pokémon for SOS.
- For a guide to Gen 7 wild RNG, check here.
-
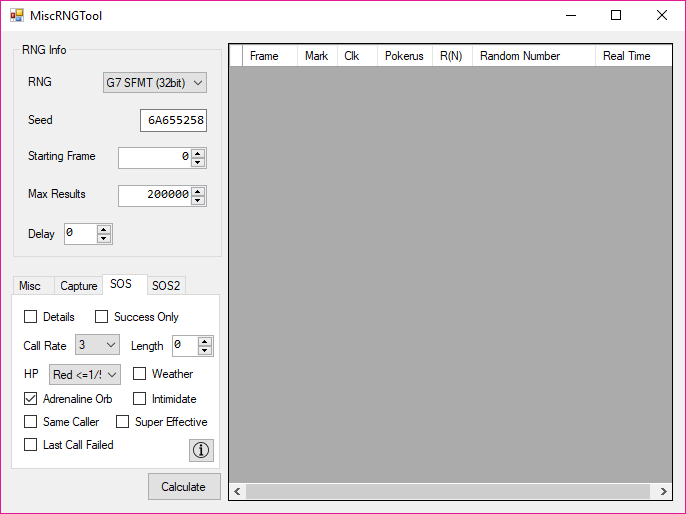
Once you’re in an encounter, open the Tools menu in 3DSRNGTool and select Misc. RNG Tool. Set the RNG type to G7 SFMT (32bit) and go to the SOS tab.
 Preview
 -
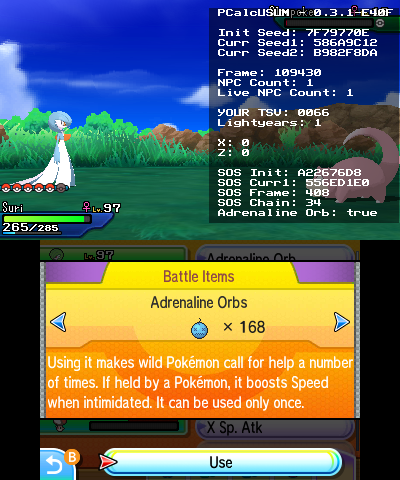
Open PCalc's Extended Game View by pressing B + Up with the Game View open. Reset the SOS info in PCalc by pressing Down + B.
- If the SOS Init Seed shows all 0's, press Down + B during the first turn of battle to refresh it.
- Find the SOS Init seed in PCalc’s window and input it into the Seed field in 3DSRNGTool.
-
Find the Call Rate and input it into 3DSRNGTool.
- You can check the Call Rate here.
-
Complete the rest of the info in the SOS tab:
- Set HP to the current caller's HP.
- Check the Adrenaline Orb box if used.
- Check the Weather box if applicable.
- If the current Pokémon has an Intimidate, Unnerve, or Pressure ability, check the Intimidate box.
- Ignore the Super Effective box; it may be less effective than previously assumed.
Note: Check the Same Caller box as long as the same Pokémon is calling. If the original Pokémon faints, uncheck it.
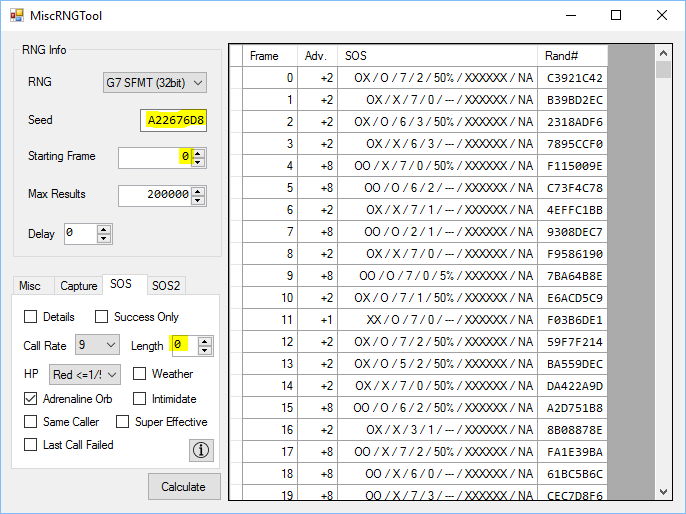
- Press Search and analyze the results.
- You'll see several fields with the following meanings:
Frame | Adv. | SOS | Rand#
SOS: call? new Pokémon? / lead / encounter slot / level / held item / IVs at 31 / Ability
- Frame: The SOS frame (starts at 0).
- Adv.: Frames advanced after the turn (higher with successful calls).
- SOS: Information about the call success:
- First value: Will the Pokémon call for help? (O = Yes, X = No)
- Second value: Will a new Pokémon appear?
- Third value: Will the lead Pokémon's ability activate?
- Fourth value: Encounter slot (weather slots, 1% chances, etc.).
- Fifth value: Pokémon level.
- Sixth value: Held item.
- Seventh value: IVs bumped to 31.
- Eighth value: Ability (Normal vs Hidden).
- Rand#: The SOS Current Seed for that frame.
Note: Some fields may not be used, but they should be self-explanatory.
Step 3: Advancing SOS Frames
The ideal time to advance SOS frames is when your chain is longer and you have better odds, higher IVs, and the desired Pokémon.- Set up the SOS conditions (Leppa Berry, Harvest, Adrenaline Orb, Synchronize, etc.).
- Check the current SOS frame using PCalc's Extended Game View.
-
After each battle turn, update the relevant info in 3DSRNGTool.
- In Misc. RNG Tool: SOS Length, SOS Frame, Last Call Failed, Same Caller.
- In the main window: Frame, Chain Length.
 Preview
 -
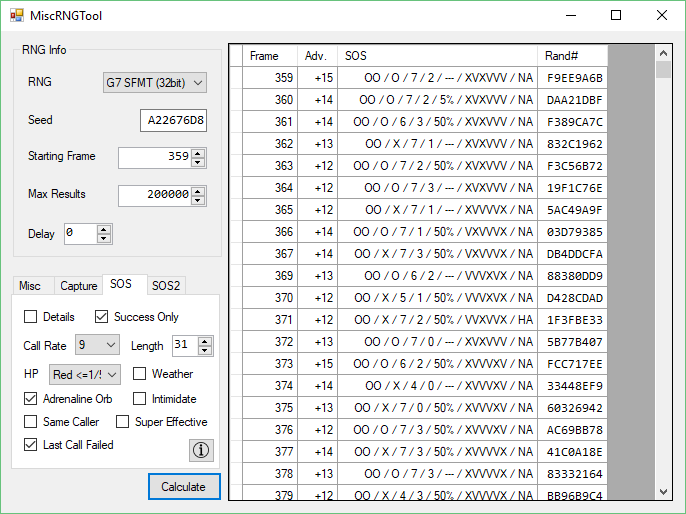
After entering the details, determine if the SOS call will succeed on the next turn:
- If the first two values in the SOS field are O, the call will succeed.
- If not, use the Adv. field to determine the next possible call outcome.
- If the previous call failed, make sure to check the Last Call Failed box before searching again.
- For successful calls, filter results by checking the Success Only box and pressing "Calculate".
 Preview
 -
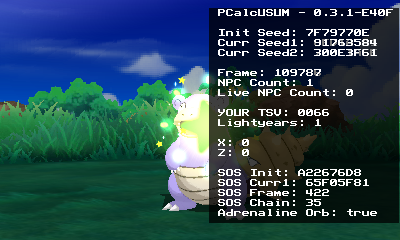
Once you hit a frame with a successful SOS call (O for both values), use it to calibrate for the Main RNG delay.
- You can advance SOS frames by using an Adrenaline Orb or by knocking out the non-caller Pokémon.
Note: Compare the SOS Current Seed in PCalc to the Rand# in 3DSRNGTool for consistency. If the seeds don’t match, adjust the frame in both tools accordingly. SOS frame advances may not always follow expectations, especially with fishing SOS RNG.
Step 4: Finding the Main RNG Delay
Configure the Main RNG Tool in 3DSRNGTool
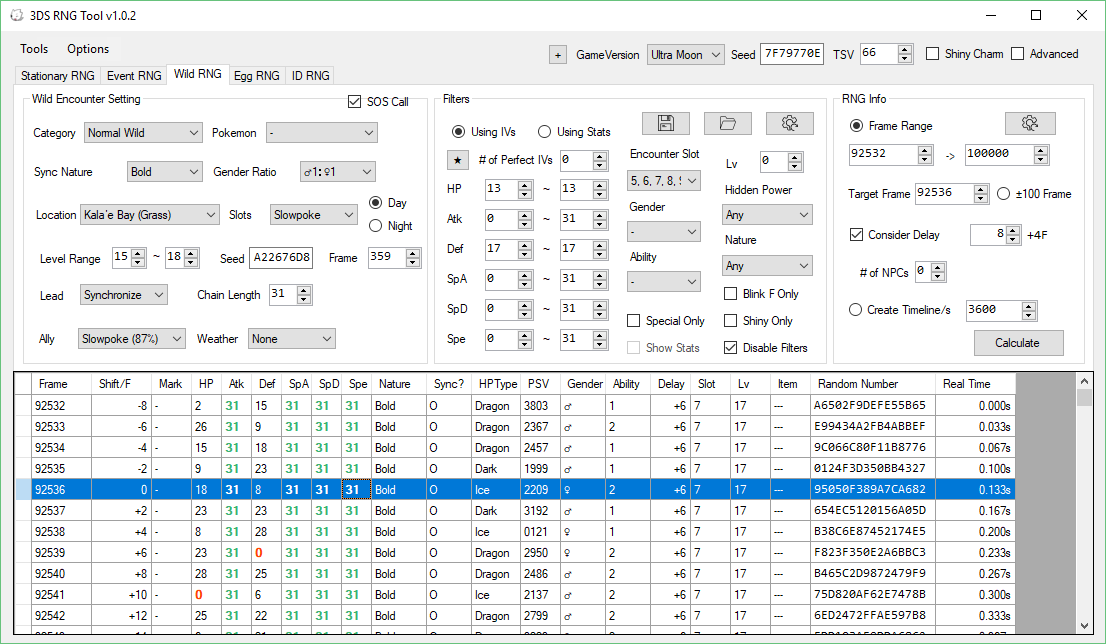
- Go to the Wild RNG tab and check the SOS Call box. Select the correct Location.
- Choose Day or Night based on your game’s time.
- Input the SOS Initial Seed (from Misc. RNG Tool) into the Seed box.
- Enter the current SOS Frame from Misc. RNG Tool into the Frame box.
- Set the correct Lead Pokémon if it has a relevant ability.
- Enter the Chain Length as shown in Misc. RNG Tool.
- If there’s weather in play, select the correct option for Weather.
Find the frame on the main RNG for the Pokémon you want
- Switch to the main 3DSRNGTool window and input your current main RNG frame as the starting frame.
- The current main RNG frame can be found by pressing Start + Up to bring up the Game View window in PCalc if it is not already visible.
- Then press Start + Select to pause the game and use the number after Frame:.
Preview
Choose a random main RNG frame to attempt to hit for calibration
- Right-click on your chosen frame and choose "Set as Target Frame".
- After that, you can trigger the last input for the turn on that frame. If two Pokémon are on the field, the delay will be longer, and the final input will be hitting A while targeting a Pokémon. If only one Pokémon is on the field, the delay will be shorter, and the final input will be hitting A while hovering over Use on the Adrenaline Orb.
Preview
Finding your hit frame
Once the Pokémon appears, you will need to find out the frame you actually hit by using the stats of the Pokémon that appeared.- Set the delay to 0 and search for the frame that was actually hit, adjusting based on the Shift/F value from the target frame.
- Then, adjust the number in the Consider Delay box to match the frame you pressed A on.
- If no results appear, the SOS frame inputted was likely incorrect. Double-check that everything matches between 3DSRNGTool and PCalc (especially SOS frame and Rand#) before trying again.
Note: If you are not finding the IVs for the Pokémon you got, double-check that the SOS frame was correct. An incorrect SOS frame will not show the correct results for the Pokémon obtained.
Note: Frame from Pokémon's stats - Target Frame = Delay
Note: You can find out what the Pokémon's stats are by pressing Start + Left to bring up the Wild Pokémon view, and then switch which Pokémon to view with Select + Right.
Preview
Step 5: Repeat to find consistent delay
- Repeat steps 3 and 4 a number of times, keeping track of your results.
- Once you begin hitting shiny frames in a block, you can attempt your actual target (aiming for maximum IVs and PID rolls at 31 chain).
- You can either go for your most common delay or choose the middle of them if they're consistent.
- For example, if the delays are 56, 58, 62, 58 would be a safe choice, as it's likely to hit within the block of frames.
Step 6: Getting your SOS target
- To find the desired SOS target, ensure you can hit your desired Encounter Slot, Sync, and/or HA. To do this, navigate to the "SOS2" tab and select the encounter slot of the Pokémon you want, whether you want Sync to be successful, and if you want HA.
- Fill out all relevant info on the "SOS" tab to determine which SOS frames will be successful.
- You can filter for successful SOS frames by checking the Success Only box.
- Now, search for your target by entering the information you're looking for in the filters and hitting "Calculate".
- You want OO as the first two values for a successful SOS call.
Note: If you're aiming for a rare target like a 1% encounter, try manipulating success by using Intimidate as you get close.

Preview
- When you've landed on your target SOS frame, it's time to find your main RNG target frame.
- Make sure you've filled out all the relevant information in the 3DSRNGTool main window.
- Don't forget to set the delay for the correct SOS call type!
- Set up the filters for your target Pokémon.
- Be aware of the IVs you can set, based on the seventh value in the Misc. RNG Tool (it should look something like VVXVVX).

Preview
- Set up your game to the point where it's ready for the final input.
- When close to your target, pause and advance your frames until you're in the middle of the group of frames, then enter the final input.
Preview
Preview
If you did not obtain the Pokémon you wanted
- Double-check that all information is correct on both windows. Sometimes, the Initial Seed or SOS Frame might be incorrectly entered.
- Restart the guide from the beginning, making sure to follow all instructions carefully. Failing to get the correct Pokémon is usually a result of user error.
- Ensure you're using the correct delay for the type of SOS call. Each SOS call type may have multiple delays associated with it. As mentioned earlier, you can either go for your most common delay or choose the middle of them if they're consistent.
- For example, if the delays are 56, 58, 62, 58 would be the safest choice, as it's likely to hit one of them in a block of frames.